Color correction effects are designed to enhance the visual quality of layers by adjusting their colors. Color correction is intended for the initial color manipulation and for fixing problems.
Auto color, contrast & levels
These effects automatically adjust the layer's color, contrast or levels.
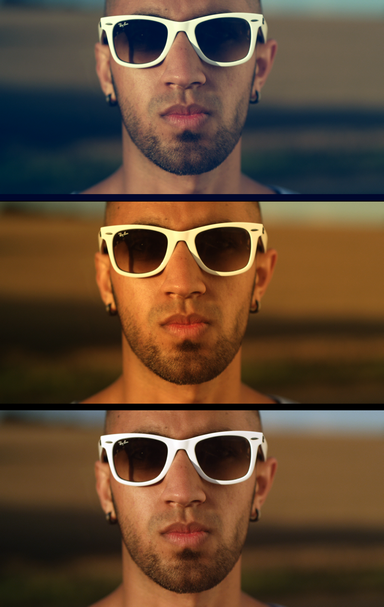
The image below shows the different results of auto color, auto contrast and auto levels from top to bottom:
By default the auto grading effects update on each frame, which can cause fluctuations in the layer's appearance as the contents of the frame change.
By activating the Select frame property you can manually choose a frame to use as the source for the automatic adjustment, which will be used for the duration of the layer.
Color temperature
Use to warm or cool your layer.
Crush blacks & whites
An alternative to simply altering the contrast, this enables you to change the black and white points separately for finer control.
Custom gray
This creates a grayscale image while providing finer control over how that image is generated. This is useful for creating specific black and white looks, as each RGB channel can be emphasized to a lesser or greater degree when creating the result, providing fine control over contrast.
Hotspots
A quick and easy way to isolate the bright areas of your layer.
Pro skin retouch
Apply realistic and subtle post-production make-up to your actors, with fine control over skin color, detection thresholds, skin treatment and highlight glow.
Skin retouching has three distinct sections:
| • | Skin Detection, used to define the area to be processed. This area is called the skin matte. |
| • | Skin Treatment, for adjusting the amount of processing. |
| • | Glow, for adding a subtle glow to the skin area. |
The view menu is used to switch between the final result, the skin matte and the source skin in isolation. Switching between these view modes makes it easier to adjust the skin detection settings.
Item |
Description |
Skin Color |
Sets the base color for skin detection. This should be adjusted based on the subject's skin color. |
Brightness Threshold |
Limits the skin detection based on brightness. |
Chroma Threshold |
The skin detection is performed in the YUV color space. The chroma threshold defines the distance around the selected color used to create the detection circle. |
Softness |
Feathers the edge of the skin matte. |
Elliptical Deformation |
Adjusts the shape of the YUV detection circle into an ellipse, which is a more optimized shape for skin detection. |
Blur Selection |
Blurs the resulting skin matte. |
Smooth |
Smoothes the skin by applying a blur. |
Edge Threshold |
The skin treatment attempts to retain edge detail while smoothing the skin. The edge threshold determines how much detail is retained. |
Saturation |
Adjusts the color intensity of the skin. A subtle saturation boost often creates a healthy appearance. |
Exposure |
Easily highlight underlit skin. |
Brightness |
Strength of the glow. |
Threshold |
Applies a threshold to the skin. Higher thresholds reduce the amount of skin used to generate the glow. |
Radius |
Higher radius will create a softer, more diffuse glow. |
Colorize |
The glow can be influenced towards a specific color. |
View |
Switch between the final result, the skin matte and the source skin. Note that this view mode will affect final rendering. |
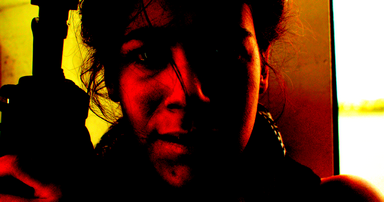
White balance
If your video was shot with incorrect white balance, this effect can help to correct the problem. Use the color pipette to select a part of the video that should be white and the layer will be corrected.
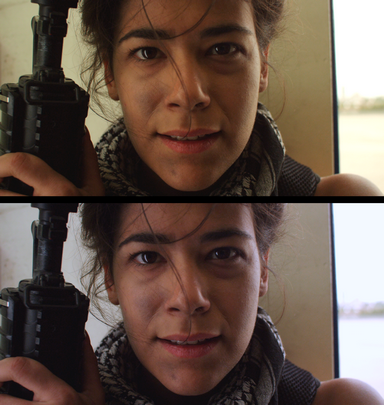
In the example below, the white balance has been set to the wall behind the actress. The top image is the original, with an overly warm, yellowish appearance, while the bottom image shows the corrected white balance.