On the Editor sequence and in composite shot timelines you can transform clips and layers using the viewer controls.
'Transforming' in HitFilm is the term used for moving clips and layers. 'Animation' refers to the animation of any property, not just position/scale/rotation.
The term layer is used during the rest of this chapter, but all transform features can be used on Editor sequence clips as well.
For information on 3D transformations see Transforming layers in 3D.
Transform controls
You need to have the Select tool activated in the Viewer to use the transform controls.
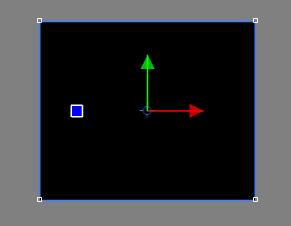
When a layer is selected on the timeline you will see its transform controls appear on the viewer. There are several parts to the transform controls.
Scaling box

This is a blue, rectangular border around your layer. At each corner is a small, white square called a handle.
Each handle can be dragged with the mouse to rescale the layer. The standard mode will not maintain the aspect ratio, so you can use this to quickly stretch or squash the layer.
If you want to maintain the correct aspect ratio, hold down Shift while dragging.
Holding Alt while dragging will rotate the layer instead.
Position arrows
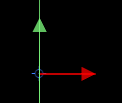
The green and red arrows are used to move the layer's position. Green represents the X axis and red represents the Y axis.
Dragging on either of the arrows will move the layer along that axis only. This makes it easy to move layers vertically without changing their horizontal position, and vice versa.
Most layers can also be moved on the X and Y axes simultaneously by dragging anywhere on the layer other than on the green and red arrows.
Rotation wheel
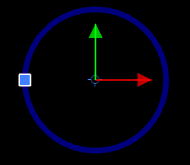
The blue square is used for rotation. Moving the mouse over the square will reveal the full rotation wheel.
Dragging on the square rotates the layer.
RECAP 2D transformations can be achieved via the Controls panel or the Viewer controls.