The canvas is where your images are displayed while you work on them.
The Canvas toolset is where you set up the size and shape of your canvas, which will directly affect your exported images.
For information on controlling and customizing the canvas view itself, check out the next chapter.
Canvas settings
Canvas settings affect the size of your exported images.
Although you can change your canvas settings at any time, it's best to get them set up when you start working on a project as changing them later can alter the composition of your images.
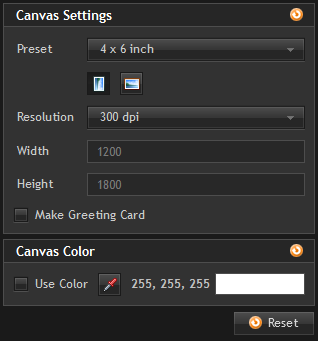
Preset
This menu contains a selection of standard photographic and paper sizes. Choosing a size will immediately update the canvas dimensions.
If you want your canvas to be the exact same size as your original photograph, choose as foreground.
Orientation
Switch between a portrait (tall) or landscape (wide) canvas.
Resolution
These standard resolutions are displayed in dots-per-inch. Make sure you choose a resolution suitable for your printing requirements.
| • | 72dpi is suitable for viewing on a screen. |
| • | For high quality printing, be sure to use a resolution of at least 300dpi. |
Width & height
The width and height of your canvas will normally be determined by your chosen preset. If you choose custom you can then enter the width and height manually.
Make greeting card
If you want to design a greeting card make sure this box is ticked. The canvas will change to show the outline of a greeting card. You will then be able to create a custom front cover for your card.
Canvas Color
Use color
By default the canvas is transparent, which is represented by a checkerboard pattern.
The checkerboard transparency pattern is not included in exported or printed images.
Selecting Use color changes the canvas to a solid color.
Background images will be shown on top of the canvas color.
The color of the background can be adjusted using the pipette icon or by clicking in the color box.
RECAP The Canvas toolset is where you set up your project.