The Key toolset is where you control the green screen removal process. With some green screen photographs you may not need to make any adjustments, but if you need to fine tune the results this is where to do it.
There are numerous filters in the Key toolset. You can use as many or as few as you want by turning them on and off.
Simply click in the title bar of a filter to activate it.
Red eye
If a photo suffers from 'red eye', caused by an on-board flash, you can correct it using the red eye filter.
By default it is set to auto and will attempt to auto-detect any red eye present in the foreground image.
If the auto-detect is not fixing the red eye in your photo, uncheck the auto option to enable manual mode.
Clicking Select Eyes activates the manual selection mode. You can now click on each red eye in the image to apply the correction.
Once you have finished selecting the affected eyes click the Complete button in the toolbox.
If incorrect areas of the image are being affected by the red eye filter, click the Clear button to reset it.
UV blur
Some digital images lack the detail required for high quality keying, which can result in jagged edges to a key. The UV blur can help to enhance the digital information and avoid this problem.
If you notice 'stepping' at the edges of your foreground layer, like a pixellated staircase, then the UV blur should be turned on.
For high quality images the UV blur is not needed.
Type
A variety of different blur types are available. Which looks best will depend upon the image itself and the type of camera used. The gaussian blur is high quality and should suffice for most uses.
Blur
Adjust the amount of UV blur with this slider according to your own personal tastes.
Auto color difference
There are two methods for removing the green screen from your photos. The auto color difference is the simpler and less powerful option. See the auto chroma key section below for the more sophisticated alternative.
Color
When set to automatic, PhotoKey will attempt to automatically detect whether you are using a green screen or a blue screen.
If your screen is not being removed at all, try specifying your backdrop color manually.
Removal
By default, PhotoKey attempts to remove as much of the green screen as possible. With reflective materials this can sometimes cause parts of your subject to disappear as well.
If parts of your foreground are disappearing try lowering the Removal setting.
Detail
The detail slider is useful if PhotoKey is not removing all of your green screen. This can be particularly noticeable if the green screen is not lit properly.
Ideally you want the detail set to 100%, which is designed for optimal green screens with correct lighting and high quality images.
Lowering the detail will help to remove more of an unevenly lit green screen but may also reduce edge detail on the subject.
Softness
The softness adjusts the edge of the removed area, as set by the detail slider.
A high softness setting will create a soft, subtle feathering around the edge.
A low softness will create a hard, solid line.
The softness setting only takes affect if the Removal setting is below 100%.
Auto chroma key
New to PhotoKey, the auto chroma key is an advanced green screen removal tool that can handle a wider range of scenarios than the simpler auto color difference.
Auto chroma key gives you much finer control over your foreground image. Although it has more settings and is more complex it will often produce higher quality results.
View
The auto chroma key has three view modes in addition to the standard views available on the canvas.
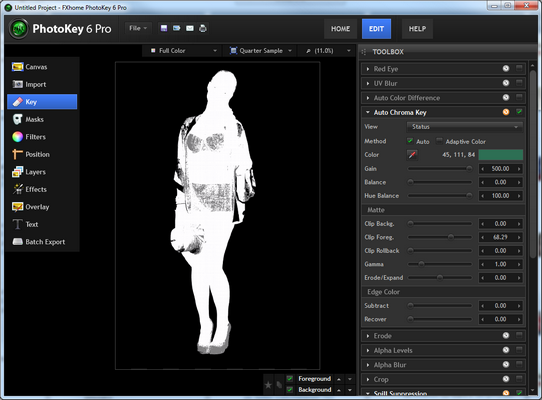
Status view
The status view shows your foreground image as three colors.
| • | Black = transparent. |
| • | White = opaque. |
| • | Grey = semi-transparent. |
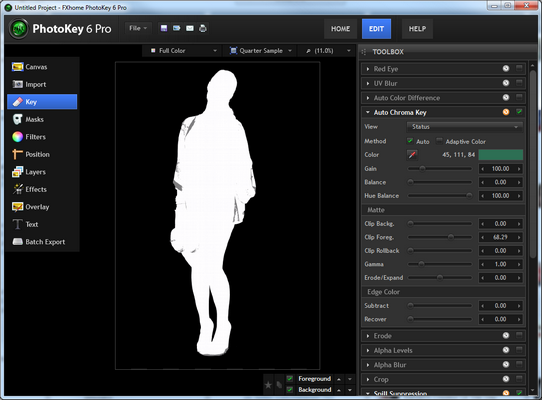
Here's an example of the status view:
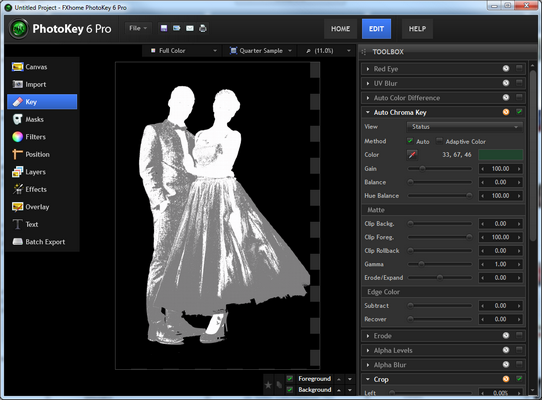
In the above example you can see that the key has a good edge but still has a lot of unwanted transparent areas, represented by the grey..
The status view is particularly useful because any pixel that is not solid or opaque is shown as grey, making it very easy to identify areas that need work.
Matte view
The matte view is similar to the status view, except the full range of greys are used to represent semi-transparency.
Here's the exact same image as shown above, instead using the matte view:
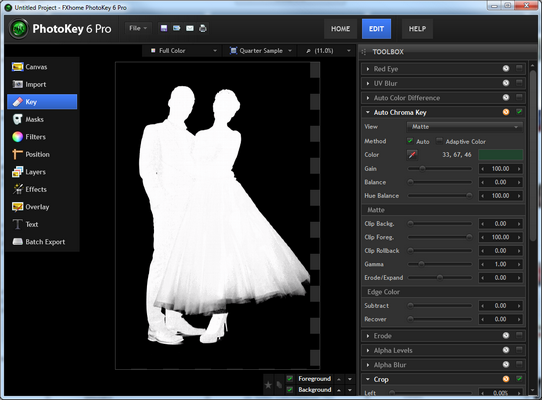
In this version you can see that the transparency is shown more subtly, with darker areas being more transparent and lighter areas being more opaque.
The matte view is useful for seeing exactly what the auto chroma key is doing to your foreground, but it can also be difficult to spot problem areas if they are very close to black or very close to white.
It's usually best to check your image using both the matte and status views.
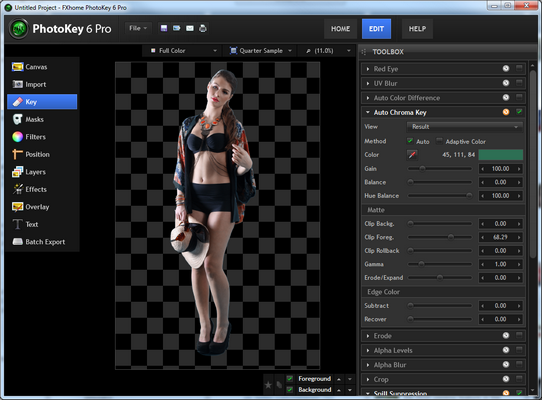
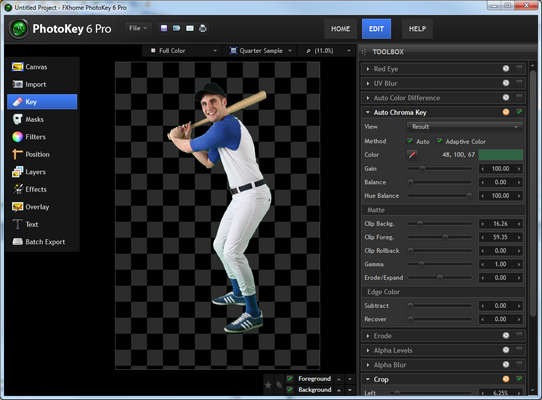
Result
The result view shows the actual composited version of the foreground.
Here's the same shot as used above:
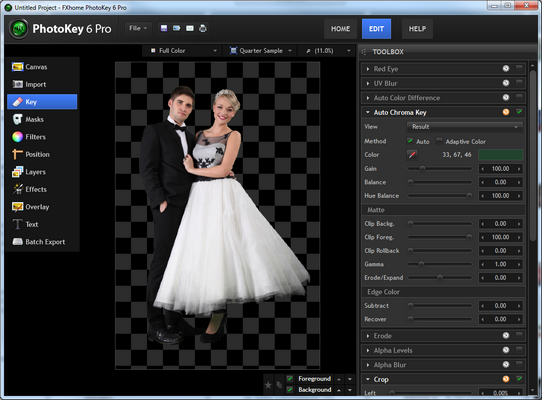
This shows why the status and matte view modes are very useful, as it's not always easy to see the transparent areas in the result view.
Switching to the other view modes makes it much easier to identify areas which need fixing.
Color
The auto chroma key can remove any color from an image. It is optimized to work with green screen and blue screen, so you will always get better results using a professional green screen than you will using another generic color.
By default the filter is set to Auto mode. This analyzes the image and picks the optimum color for achieving good results.
If you want to pick your own color you can click the color box, or click and hold on the pipette icon to select any color on the screen.
Clicking the Auto button at any time will revert back to the Auto mode.
Adaptive color
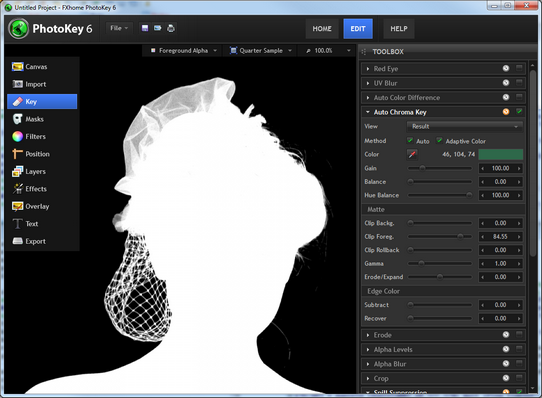
This method is particularly effective when working with uneven green screens. Even slight changes in tone or brightness across your green screen can cause keying complications. Adaptive color aims to improve results in such cases and can be particularly effective with fine detail areas such as lace and hair.
Here is a close-up of a veil without adaptive color, in which some detail has been lost:
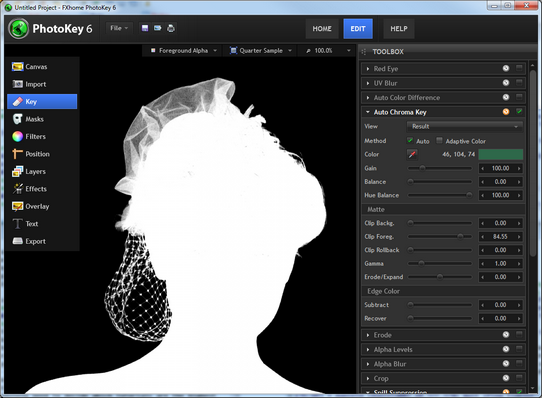
With adaptive color turned on, extra detail in the veil and the hair on the right side of the image is instantly apparent:
When adaptive color is activated the Gain setting will have a minimal effect. Key adjustments should be made primarily using the clip foreground and clip background settings.
If your original photo has a lot of digital noise or compression, these artefacts may be made more evident when using adaptive color.
Gain
Gain is the base sensitivity of the chroma key.
This is best used for the initial background removal. It should be adjusted until the subject is isolated, though you don't want to push the gain too far as you will start to lose edge detail.
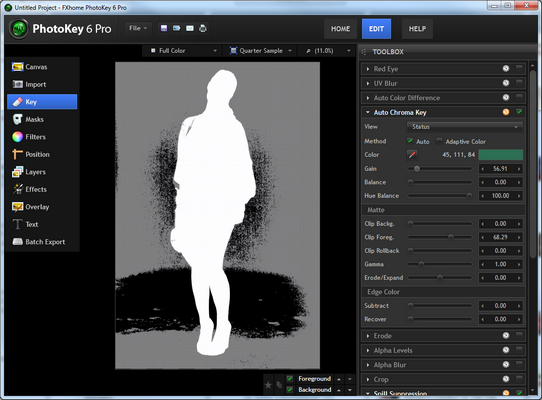
Let's look at an example of the effects of gain using this image:
. With the default setting of 100 this image looks like this when in status view mode:
The background has been successfully removed, while keeping detail in the foreground.
With a lower gain of 56, the status view is very different, with only some of the green screen having been removed:
Increasing the gain to 500 causes full background removal, but detail is also lost in the foreground:
Gain should therefore be adjusted to remove the background but should not be pushed any further than is needed.
Balance & hue balance
These two settings adjust the emphasis of the chroma key, affecting the range of colors that are affected.
In practical use, it is usually best to try them at the minimum and maximum values to see which best suits your image.
Clip background
Crushes the black point of the matte, so that more parts of the image are removed. If parts of your green screen are still visible this should be used to remove them.
Clip foreground
Boosts the white point of the matte, returning detail to the foreground. If parts of your subject are semi-transparent, you should reduce the clip foreground to make them fully opaque.
This is the main setting to change if your foreground is losing detail.
Clip rollback
After adjusting the clip foreground you may want to return some of the semi-transparency to the outer edges of your foreground. This helps to create a softer edge, although increasing this setting too much will cause an undesirable band of semi-transparency around the edge.
Gamma
Adjusts the strength of the key. This can be useful for adjusting the fine detail at the edges of the key, particularly around hair and semi-transparent areas.
Erode/Expand
This works in a similar way to the standalone Erode filter and can be used to expand or erode the alpha matte. If you need to add or remove pixels from the edge of the key this can be very useful.
Subtract
Increasing the subtract setting removes the background color (for example, green if you're using a green screen) from the semi-transparent areas of the image. This can be very effective for reclaiming the correct color in semi-transparent areas, such as glass.
Recover
In some green screen photos you may see a thin, dark edge. This can be caused by lighting or compression methods in digital cameras and is most often seen on white clothing or along the edges of pale skin.
The recover setting can counter this problem by adjusting the colors of the outer pixels. Rather than using their actual color, instead they will take on the color of the pixels further inside the foreground.
Although this can be use to remove dark edging, if set to high you will see noticeable color banding around the edge of the key.
Erode
Some cameras record to compressed formats which can introduce edge problems under some conditions. Often the easiest way to fix this is to erode the keyed image, removing a layer of pixels around the outer edge of the keyed subject matter.
Erode should be used sparingly and only when absolutely necessary.
If you are using the auto chroma key you can use the integrated Erode/Expand setting instead.
Alpha levels
Adjusting the contrast levels of the alpha channel allows you to fine tune your key. This can be particularly useful with hair or lace and provides an additional level of control over the key.
Alpha blur
If you want a softer edge to your key you can add some alpha blur. This can also be useful if you are working with low quality photographs and need to disguise a problematic edge.
Crop
The left, right, top and bottom sliders can be used to crop the edges of the foreground image. This can be useful if your green screen did not fill the entire frame.
Spill suppression
Even a perfectly composited image can still suffer from color spill. This is when the green or blue of the screen is reflected on the subject. While this is often difficult to see in the original image, once it has been composited it becomes extremely obvious, resulting in unwanted color fringing around edges.
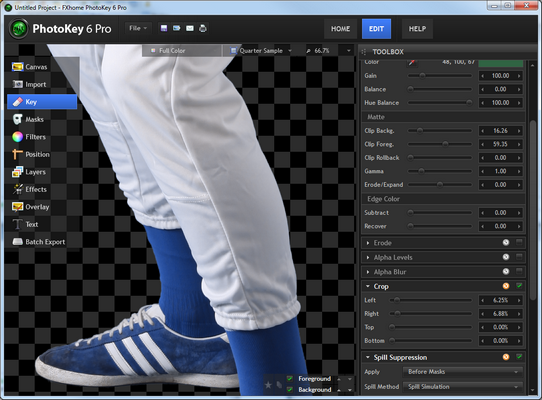
In this original photo the green spill is not immediately obvious to the naked eye:
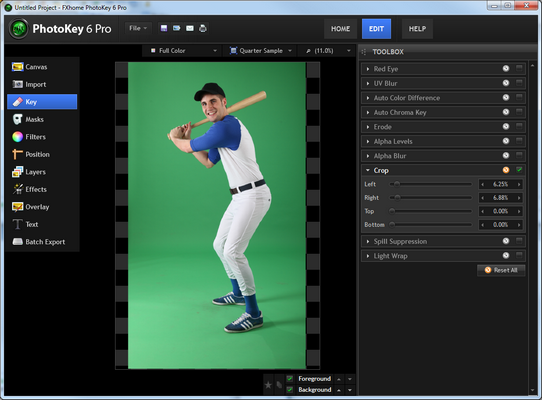
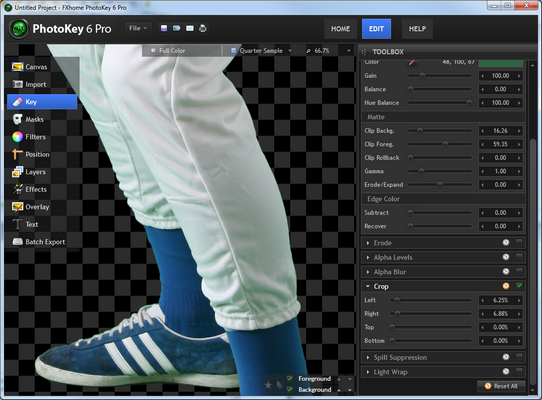
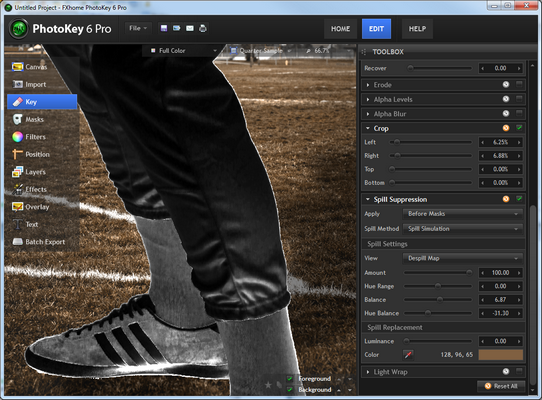
Once the green screen is removed by PhotoKey, it is evident that there is green spill on the clothing, especially the pants and shoes:
Here's a close-up view:
With PhotoKey's spill suppression turned on, the green tint is replaced with a neutral color, without the other colors being affected:
The amount of spill will vary depending on the subject and your green screen setup. White clothing as in the examples above tends to reflect green more obviously than other colors.
Apply
Spill suppression can be applied before or after masks.
If applied before, any masks that are set to retain will include the original coloring from the photo. This is useful if you are using masks to fix problems such as a disappearing green clothing, for example.
If applied after, the entire image will be spill suppressed, including any masked areas set to retain. This is useful if you are using masks to fix problems such as highly reflective materials or crystal.
Spill method
There are three types of spill suppression: standard, extended and spill simulation.
In most cases spill simulation will provide the best results, although standard and extended can also provide good results and are simpler to use.
Spill simulation
The spill simulation method gives you fine control over the spill suppression, ensuring high quality results.
View
You can switch to the despill view mode when using the spill simulation method. This shows exactly which parts of the image will be spill suppressed.
| • | White = suppressed area. |
| • | Grey = partially suppressed area. |
| • | Black = unsuppressed area. |
You can use the despill view to make sure that only the areas that need spill suppressing are affected. This can be very useful for avoiding discoloration of your subject.
Amount
Varies the strength of the spill suppression.
Hue range, balance & hue balance
These three sliders area used to adjust how much of the foreground image is affected by the spill suppression. They are best adjusted when in the despill view.
Luminance
The spill replacement color can be used to replace the original green screen spill with a new color. If your background has a dominant color this can be extremely effective for creating a realistic composite.
Luminance determines how much the spill replacement color affects the brightness of the foreground.
Color
You can choose a new spill replacement color using the pipette or by clicking on the color box.
The default is a neutral grey R128 G128 B128.
Here is an example of spill replacement at work. First we have the keyed photo without any spill suppression, with green spill clearly visible:
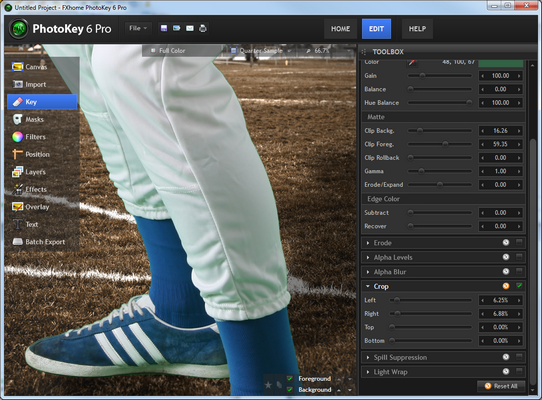
Here is the same foreground with spill suppression applied:
It is clearly an improvement, with the green spill removed and changed to a neutral grey. However, this causes the foreground to look more blue than the background. Spill replacement can be used to replace the green spill with a new light spill taken from the background.
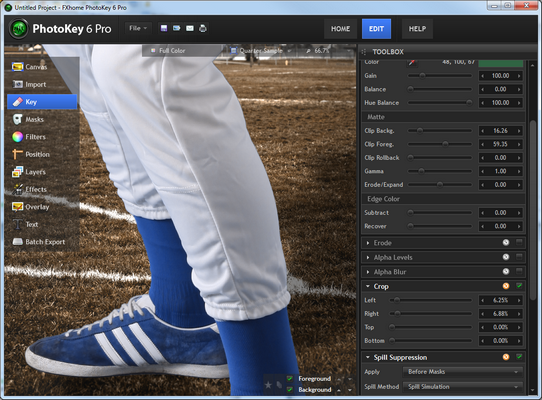
Here's a final example using spill replacement with the color set to the dry grass color of the background:
Note how the white of the pants and the underside of the shoes have now taken on the same light ambience as the background, helping to blend the two images together.
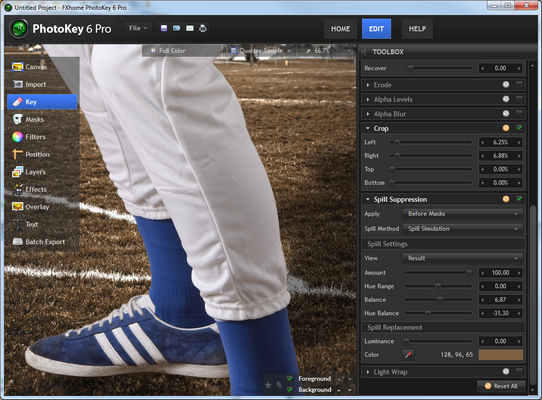
You can see how this works by looking at the despill view for this particular image:
Black areas are unaffected by the spill replacement, while white areas are more processed. In this example you can see that the underside of the shoe has been heavily spill suppressed. The area affected can be adjusted using the spill settings.
Used appropriately, spill replacement can massively improve the realism of an image without causing discoloring.
Standard and Extended
Strength
Standard and Extended both have a simple Strength setting that adjusts the amount of suppression.
Light wrap
This effect simulates the appearance of light from the background interacting with the foreground, as would happen with the normal photographic process.
Size
Alters the intensity of the light wrap. Adjust this to match the lighting in the foreground and background images.
Blend mode
There are several different light spill methods. Lighten tends to be the most realistic, while Soft Light can be effective for dark backgrounds.
RECAP The Key toolset gives you full control over the green screen removal process.