Green screens and blue screens have been used for decades for filmmaking and photography and have become an invaluable part of a photographer's toolkit. By photographing subjects against a green screen or a blue screen, they can be easily isolated and placed onto a new background.
Here is an example of a bride photographed against a green screen:
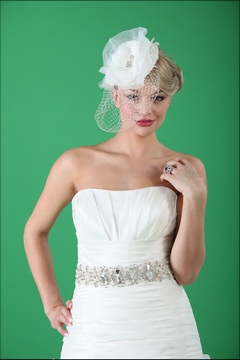
PhotoKey instantly removes the green screen background from the photo, leaving a cleanly isolated version of the bride:

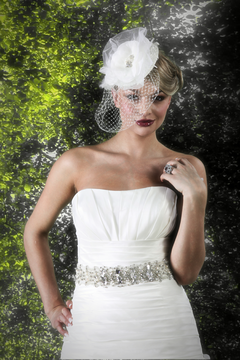
PhotoKey can then be used to add in a new background and make other adjustments to positioning and appearance:
Removing the green screen or blue screen from the original image is this automated manner is known as 'keying'. PhotoKey 6 Provides advanced keying methods that can achieve amazing results even from less than perfect source images.
Green screen or blue screen?
The primary reason for using a specific color backdrop is to avoid clashing with any colors on your subject. This is why red screens are not commonly used - due to the amount of red in human skin, it's impossible to get good results when shooting people. Green and blue are both far less prominent in skin tones and therefore work as a successful keying color. Take careful note of clothing, hair and other objects in the shot and make sure that you choose an appropriate backdrop.
If you absolutely can't avoid some color clashes, take a look at the Masks chapter.
Some digital cameras also have a tendency to retain more green data than blue, so if you are in a position to use either green or blue it is generally advisable to choose green.
Blue screens and green screens can be purchased and rented from many places, including photographic, filmmaking and fabric stores, as well as specialist dealers. Prices vary, so make sure you shop around!
Setting up your green screen
Greenscreen and bluescreen photography has a few unique factors to bear in mind.
Taking extra care while setting up your greenscreen can often save time and headaches when you get to the compositing stage.
| • | Make sure your material is matte, not shiny. Shiny backgrounds will reflect too much light and have bright 'hotspots'. |
| • | Avoid textured materials - go for smooth materials that won't cast any shadows. Textures can make it difficult to separate the subject from the background. |
| • | Avoid creases and wrinkles in the backdrop. These can cast shadows and cause imperfections in the composite. |
| • | Always try to position your subject as far away from the backdrop as possible. This will reduce the amount of green or blue that is reflected onto them, making it an easier composite. Aim for a minimum of 6 feet when possible. |
| • | Make sure your subject is not casting any unwanted shadows on the backdrop. Shadows can make compositing much more difficult. |
| • | Light your backdrop independently from your subject. This enables you to light your background smoothly while retaining a more dramatic setup for your subject. |
| • | Avoid photographing green subjects against greenscreens, or blue against bluescreen. You should always try to use the screen that is furthest from the colors of your subject. If color clash is unavoidable then you can use the Mask feature to perform corrections. |
| • | Try adding a very, very subtle magenta light behind your subjects. This can help to counter green spill light from the greenscreen and increases separation. |
RECAP Working with green screen is a fast and efficient process, but spending more time to set up your studio correctly can really pay off when you get to the computer.