Additional layers can be added to your image using this toolset. This can be useful for adding props, logos, watermarks, or depth layers.
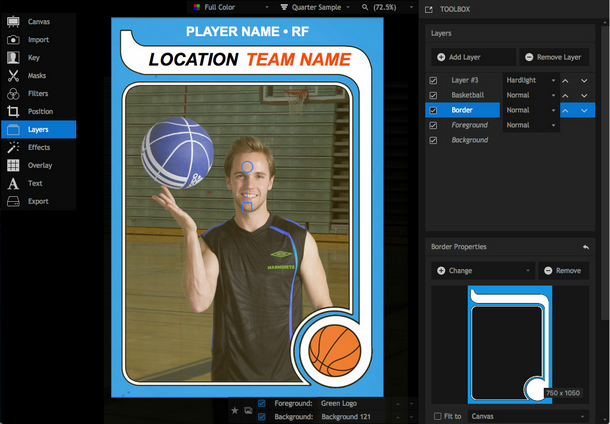
Layers are standard image files, so you can use anything you like for your layers. Images that include alpha transparency data (such as PNGs and TIFFs) are particularly useful, as in the above examples. The following image uses three layers: One for the border, one for the basketball image in the lower right, and a more subtle overlay that adds aging to the entire project.
Layers are not designed for green screen images. Only the Foreground layer (found in the Import toolset) will process green screen photographs.
Creating layers
The Layers panel is where you manage your various layers.
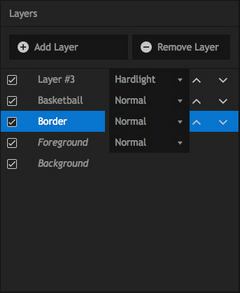
The large area at the top (shown above) is your Layers list. Initially you will only see the standard Foreground and Background layers. The Foreground layer is you green screen photograph.
| • | Add Layer: click this button to add a new layer. Up to 16 new layers can be added. |
| • | Remove Layer: this button will remove the currently selected layer. |
| • | Layers can be enabled or disabled with the tickbox to the left of the layer name. |
| • | To rename any layer, double-click its name in the list, then type the new name you wish to assign to the layer. In the image above, Layer #3 still has its default name, while the two layers below it have been renamed to indicate their contents. |
| • | Blend Mode: each Layer can use a different blend mode, to control how it interacts with the layers below it. Layer #3 in the image above has been assigned a Hard Light blend mode. |
| • | Up/Down Arrows: click the up or down arrows to move a layer through the layer stack. You can move layers below the Foreground, but not below the background. |
Understanding the layer order
PhotoKey composites from the bottom of the list to the top. Therefore layers higher up in the list will be in front of layers lower in the list. Any additional layers that are positioned below the Foreground in the list will appear behind the Foreground. You can re-order your layers at any time by clicking the up or down arrows to move them through the layer stack. Here is the original image we looked at above, but with the Border layer moved below the foreground:
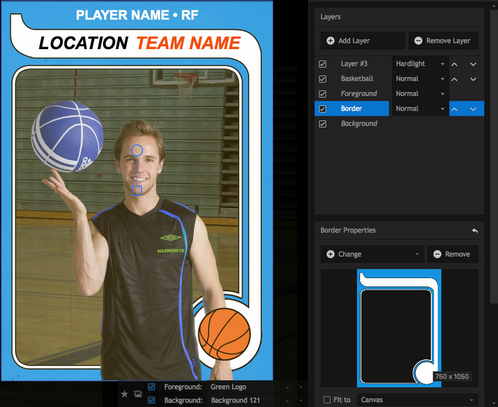
You can move layers below the Foreground, but not below the background.
Layer Properties
The currently selected layer is displayed in the lower half of the toolbox. This is where you import the layer's image and choose its settings.
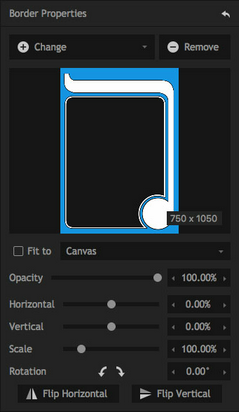
| • | Add/Change: click the Add button to add an image to a new layer. This opens a standard file browser which you can use to select your image. Once a layer contains an image, the Add button will be replaced with a Change button, which you can click to select a different image for that layer. |
| • | Remove: clicking this button will remove the image the image from the layer. |
| • | Fit To: you can choose whether to have layers automatically match a predefined size, position, and shape, or position them manually. The drop-down menu allows you to choose whether the overlay should auto-fit to the canvas, the foreground or the background. This works best when the layer image matches the size and shape of the layer you assign it to fit to. If the layer sizes differ, enabling fit to will distort the layer image to match the selected layer. |
When Fit To is disabled, the position, scale and rotation tools become available.
| • | Horizontal: adjusts the position of the layer from left to right |
| • | Vertical: adjusts the position of the layer from top to bottom |
| • | Scale: shrinks or enlarges the image. |
| • | Rotation: rotates the image in either direction. The angle buttons can be used to rotate the image 90 degrees clockwise or 90 degrees anti-clockwise. |
| • | Flip Horizontal: flips the image left to right |
| • | Flip Vertical: flips the image top to bottom |