The mask tools are used to manually specify areas of your foreground images to be removed or retained. This is useful if your subject is wearing an unavoidable item of green clothing, or if you need to remove parts of the image outside of the green screen.
Note that PhotoKey's main advantage is in its automatic and fast keying tools. If you are needing to regularly mask images we would recommend improving your green screen setup. A little time improving the setup can save a huge amount of time in PhotoKey.
Mask creation
You can add multiple masks to your foreground image. Each mask is listed in the toolbox.
To create a mask, click the Add Mask button, then click on your image to set control points that define the shape of the mask. Once you have completed drawing all the control points required, click the first control point again to close the mask shape. Once the mask is closed, it will activate, and you can then edit the Mask properties to control how the mask interacts with your image.
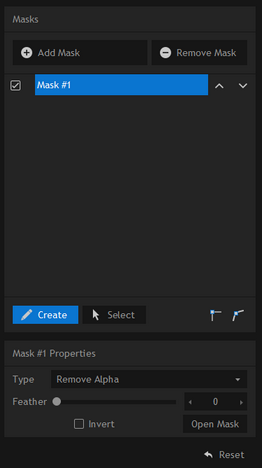
Mask Controls
| • | Add Mask: a new mask can be added by clicking the add mask button. |
| • | Remove Mask: this button will remove the currently selected mask. |
| • | Mask List: up to 10 masks can be added to an image. Masks you have added are displayed in the mask list. |
- Click on a mask in the list to edit it in the workspace.
- Individual masks can be turned on and off using the checkboxes
- The order of your masks can be edited using the up and down arrows.
- To rename a mask, double-click its name in the mask list, then type in the name you wish to assign to the mask.
| • | Create: when the Create button is activated you can draw your mask shape directly onto the canvas. |
- Single clicking will add points to the shape, connecting each of them with straight lines.
- If you click and drag the point will be converted to a curved point, enabling you to make custom curves. Additional handles will appear around the point that can be used individually to adjust the curve angle. Holding Ctrl while clicking on a curve handle will select both of them at once.
- Clicking anywhere on the mask line will add a new point.
| • | Select: when the Select button is activated you can select and adjust your mask without accidentally adding new points to the shape. When in the Create mode, Select mode can be temporarily activated by holding down Ctrl. |
- Points can be moved using the mouse.
- Multiple points can be selected by holding Ctrl while clicking, or you can drag a selection box around them on the canvas.
| • |
| • |
Mask Properties
Once you have added at least one mask the currently selected mask's properties are displayed underneath the mask list.
| • | Type: switches between the mask shape removing or retaining the selected area of the image. |
| • | Feather: a low feather setting creates a hard edge to the mask, while a high feather creates a soft, blurred line that can often disguise the mask's position. |
| • | Invert: This toggle switches between the area inside or outside of your drawn shape being the selected area for masking. |
| • | Open mask/Close mask: this toggle allows you to easily open or close your mask shape. A mask will only activate once it has been closed. |