The text toolset can be used to apply multiple titles to your images. Text is applies to your image after effects and overlays, and will thus appear in front of everything else in your composite.
Creating text
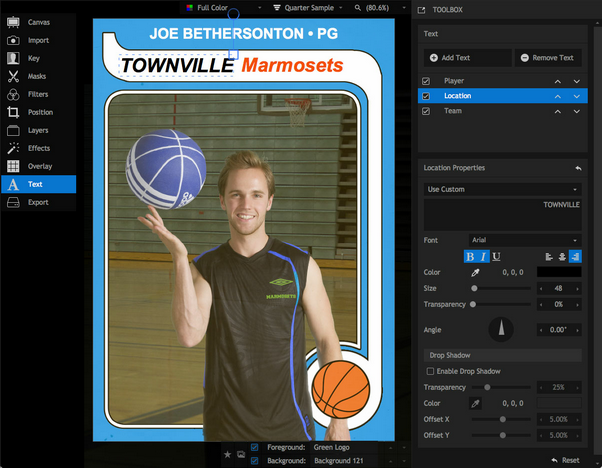
The text panel is where you can create text layers to add to your project.
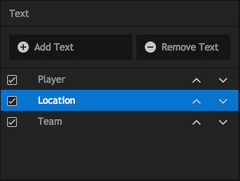
The large area at the top (shown above) is your text list. Initially there will be no text items listed.
| • | Add Text: click this button to add a new layer. Up to 5 text items can be added. |
| • | Remove Text: this button will remove the currently selected text item. |
| • | Individual text items can be enabled or disabled with the tickbox to the left of the layer name. |
| • | To rename any text item, double-click its name in the list, then type the new name you wish to assign to the layer. In the image above, all three text items have been renamed to indicate their contents. |
| • | Up/Down Arrows: click the up or down arrows to move a text item through the stack. If text items overlap,higher layers will be rendered in front of the layers below them. |
Text properties
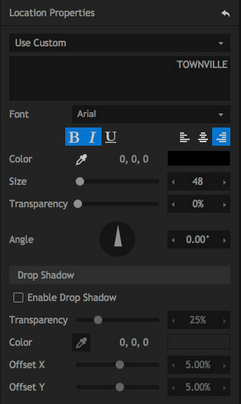
Text Contents
There are 3 types of text items.
| • | Custom - displays a text box in which you can enter your own choice of text. When custom is selected,a box will be displayed below the menu, where you can enter the contents of your text item. In this example, the selected layer has been given the contents "TOWNVILLE." |
| • | Use Filename - automatically displays the current foreground image's filename as the text item. |
| • | Use File Path - automatically displays the current foreground image's file path as the text item. |
Formatting
These controls are used to edit the specific appearance of the text item.
| • | Font: choose a font from the list of fonts installed on your computer system. |
| • | Format: these three toggles allow you to apply bold, italic and underline styles. |
| • | Alignment: choose between left, right and center alignment. |
| • | Color: assign any color to your text. You can use the pipette to select a color from your image, or click the color swatch to access the color picker. |
| • | Size: adjust the size of your text, in points. |
| • | Transparency: increase the transparency if you want your text to be more see-through. |
| • | Angle: rotates the text. |
Drop Shadow
PhotoKey 8 Pro adds the ability to easily add fully customizable drop shadows to your text.
| • | Enable Drop Shadow: turns on the drop shadow effect |
| • | Transparency: adjusts the transparency of the shadow. Increasing the transparency can make the effect much more subtle, while reducing it completely can give a bolder graphic styling. |
| • | Color: choose the color your shadow will use. Use the pipette to select a color from your image, or click the color swatch to use the color picker. |
| • | Offset X: adjusts the horizontal position of the shadow relative to the text item. |
| • | Offset Y: adjusts the vertical position of the shadow relative to the text item. |
Canvas controls
The position, rotation and size of text can be adjusted directly on the canvas.
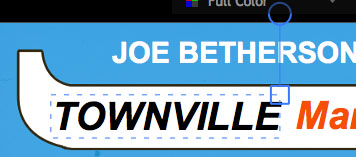
| • | Position: dragging anywhere within the dashed blue bounding box will move the text around the canvas. Holding Ctrl (Cmd on Mac) while dragging will restrict the movement to either the horizontal or vertical depending on the direction you move the mouse. |
| • | Scale: dragging on the square blue control handle enables you to enlarge or shrink it. The position of this handle will vary based on the alignment of the text. In the above example, the text is right-aligned, so the handle is on the right. |
| • | Rotation: dragging on the circular blue control handle enables you rotate the text item clockwise or anti-clockwise. Holding Ctrl (Cmd on Mac) while rotating will restrict the rotation to 45 degree increments. |