PhotoKey 6 Pro exclusive.
The batch export system enables you to process multiple images with minimal user interaction.
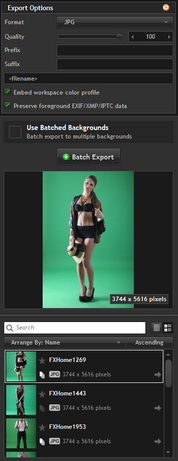
Export options
This section allows you to change the format and filename settings for your exported images. This affects both batch exporting and individual image exports.
Format
Three output formats are available, PNG, TIFF and JPEG. Choose whichever one you prefer to work with.
JPEG does not support an alpha channel, so if you export without a background the transparency information will not be retained. Instead, the foreground will be composited directly onto white.
Compression & quality
Each format has a variety of compression and quality settings. High quality will produce larger filesizes.
Prefix
When exporting several batch images, it's often useful to add a prefix to the filename. You can enter a prefix here if you wish.
Suffix
If you also wish to add a suffix to the filename, you can do so here.
A preview of the filename is shown at the bottom of the options panel.
Embed workspace color profile
Includes the workspace color profile in the exported image. This ensures that you can retain the same workspace if you continue processing or printing the image elsewhere. See Options for more information on color management.
Preserve foreground EXIF/XMP/IPTC data
Metadata from the foreground image can be included in the export image, such as camera and lens information.
Batch processing
There are two methods of batch processing.
Batched backgrounds
During a batch export you can optionally use more than one background image by activating the Use Batched Backgrounds option.
Each foreground image will then be exported in turn with each selected background. Therefore if you have 5 backgrounds selected for batching and 2 foregrounds, the export will result in 10 exported, new images.
Select your backgrounds for batching in the Import toolset.
Batch export
This is the standard batch export system, which is based on a user-defined list of images to be exported.
Your imported images are displayed in the list. See the Batch import chapter for details on searching and arranging the list.
You can export as many images at a time as you wish. Images must be tagged with the batch icon to be included on the batch list.
You can also select multiple images and add them all to the batch list by selecting the Add to batch list option from the right-click menu.
Click the Batch export button to select an export folder and process the tagged images in the list.
Auto export
The auto export option is only available when you are using a hot folder.
See the Batch import chapter for information on using hot folders.
Clicking the auto export button will prompt you to select an export folder, after which PhotoKey will go into auto export mode.
During auto export mode, PhotoKey functions as follows:
| • | The hot folder will be monitored for any new images, which will be imported. |
| • | The auto export system will monitor for any images in the image list that have not been processed and exported. |
| • | Any unexported images will be processed and exported to the chosen folder. |
| • | After an image is processed and exported it will be marked with a green arrow in the image list. |
| • | Once all images in the list have been exported, PhotoKey will remain in auto export mode. Any new images that appear in the hot folder will be automatically processed. |
To exit auto export mode simply click the Stop button.
After stopping an auto export you can resume it at any time by clicking the auto export button again.
Images that have already been exported (marked by the green arrow) will not be re-exported. You can manually reset the export tag by clicking the green arrow next to the image's name in the list.
Note: Manually selecting images for batching only applies to the standard batch export. Auto export mode ignores the white stack icon.