The auto chroma key tool provides advanced green screen removal with professional quality results. Auto chroma key gives you fine control over your keyed foreground, and can handle a much wider variety of challenging or problematic images than color difference keying.
Key Properties
View
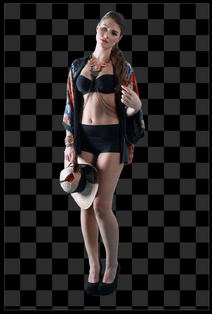
The auto chroma key has three view modes in addition to the standard views available on the canvas. These make it easier to identify and fix compositing issues. The following images show, from left to right, Status View, Matte View, and Result View.
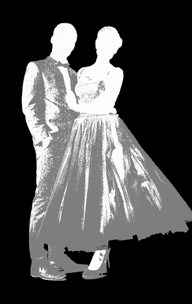

| • | Status view (image 1): the status view shows your foreground image as three colors. |
Black: transparent
White: opaque
Grey: semi-transparent
In the above example you can see that the key has a good edge but still has a lot of unwanted semi-transparent areas, represented by the grey. The status view is particularly useful because any pixel that is not solid or opaque is shown as grey, making it very easy to identify areas that need work.
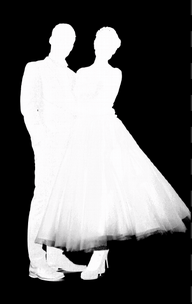
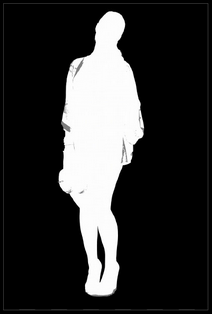
| • | Matte view (image 2): the matte view is similar to the status view, except the full range of greys are used to represent semi-transparency. In this version you can see that the transparency is shown more subtly, with darker areas being more transparent and lighter areas being more opaque. The matte view is useful for seeing exactly what the auto chroma key is doing to your foreground, but it can also be difficult to spot problem areas if they are very close to black or very close to white. |
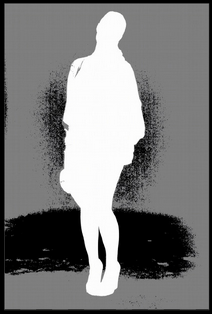
| • | Result view (image 3): the result view shows the actual composited version of the foreground. This shows why the status and matte view modes are very useful, as it's not always easy to see the transparent areas in the result view. Switching to the other view modes makes it much easier to identify areas which need fixing. |
Method
PhotoKey automatically identifies the primary background color and removes it from the image. The Method options alter how PhotoKey analyzes the image to determine the screen color:
| • | Manual - you can specify a color to key out yourself, using the Color settings (see below). If the auto color system is not removing the desired color, try using manual to select the color you wish to have removed. |
| • | Auto low - takes the color from the low point of the image's peak hue. |
| • | Auto mid - often produces the best results, by taking a mid-point from the image's peak hue. |
| • | Auto high - selects the the highest point from the image's peak hue. |
| • | Auto classic - included for legacy compatibility. Selects the color from the low end of the image's histogram, which can sometimes produce overly aggressive results. |
Color
The auto chroma key can remove any color from an image. It is optimized to work with green screen and blue screen, so you will always get better results using a professional green screen than you will using another generic color.
By default the filter is set to Auto mode. This analyzes every pixel in the image to determine which hue will remove the largest number of pixels if selected. It then uses the selected method to determine how that hue is handled.
If the auto color system is not removing the desired color, or you want to select your own color, you can click and hold on the pipette tool, then drag onto your image to select any color on the screen. You can also click the color swatch and select a color from the color picker if desired.
Clicking the Auto button at any time will revert back to the Auto mode.
Adaptive color
This method is particularly effective when working with uneven green screens. Even slight changes in tone or brightness across your green screen can cause keying complications. Adaptive color aims to improve results in such cases and can be particularly effective with fine detail areas such as lace and hair.
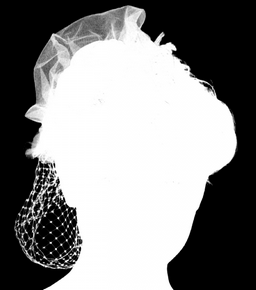
On the left is a close-up of a veil without adaptive color, in which some detail has been lost:
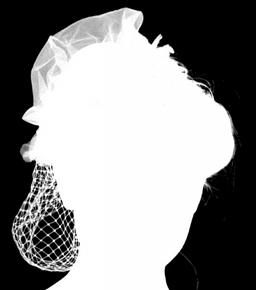
In the right-hand image, with adaptive color turned on, extra detail in the veil and the hair on the right side of the image is instantly apparent. When adaptive color is activated the Gain setting will have a minimal effect. Key adjustments should be made primarily using the clip foreground and clip background settings.
If your original photo has a lot of digital noise or compression, these artefacts may be made more evident when using adaptive color.
Gain
Gain is the base sensitivity of the chroma key. This is best used for the initial background removal. It should be adjusted until the subject is isolated, though you don't want to push the gain too far as you will start to lose edge detail. Let's look at an example of the effects of gain using this image:
Below, (image 1) shows the status view of this photo, with the default gain setting of 100. The background has been successfully removed, while keeping detail in the foreground. With a lower gain of 0.56 (image 2), the status view is very different, with only some of the green screen having been removed. Increasing the gain to 5.00 (image 3) causes full background removal, but detail is also lost in the foreground
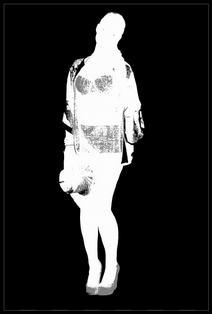
Gain should therefore be adjusted to remove the background, but should not be pushed any further than is needed.
Balance & Hue Balance
These two settings adjust the emphasis of the chroma key, affecting the range of colors that are affected. In practical use, it is usually best to try each of them at their minimum and maximum values, to see which gives the best results on your image.
Matte
Clip Background
Crushes the darkest areas of your matte, to remove unwanted artifacts of the green screen. If areas of your green screen are still visible, increase this slider to remove them. Note that this can negatively impact fine edge detail, so in most cases Gain and Gamma should be adjusted first.
Clip Foreground
Boosts the white point of the matte, returning detail to the foreground. If parts of your subject are semi-transparent, you should reduce the clip foreground to make them fully opaque. Note that this can negatively impact fine edge detail, so in most cases Gain and Gamma should be adjusted first.
Clip Rollback
After adjusting the clip foreground you may want to return some of the semi-transparency to the outer edges of your foreground. This helps to create a softer edge, although increasing this setting too much will cause an undesirable band of semi-transparency around the edge.
Clip Rollback will only affect areas that have been modified by the Clip Foreground property. If clip foreground has not been adjusted, then clip rollback will have no effect.
Gamma
Adjusts the strength of the key. This can be useful for adjusting the fine detail at the edges of the key, particularly around hair and semi-transparent areas.
Erode/Expand
This works in a similar way to the standalone Erode filter and can be used to expand or erode the alpha matte. If you need to add or remove pixels from the edge of the key this can be very useful.
Edge Color
Subtract
Increasing the subtract setting removes the background color (for example, green if you're using a green screen) from the semi-transparent areas of the image. This can be very effective for reclaiming the correct color in semi-transparent areas, such as glass.
Recover
In some green screen photos you may see a thin, dark edge. This can be caused by lighting or compression methods in digital cameras and is most often seen on white clothing or along the edges of pale skin.
The recover setting can counter this problem by adjusting the colors of the outer pixels. Rather than using their actual color, instead they will take on the color of the pixels further inside the foreground.
Although this can be use to remove dark edging, if set to high you will see noticeable color banding around the edge of the key.