The Key toolset is where you control the green screen removal process. With some green screen photographs you may not need to make any adjustments, but if you need to fine tune the results this is where to do it.
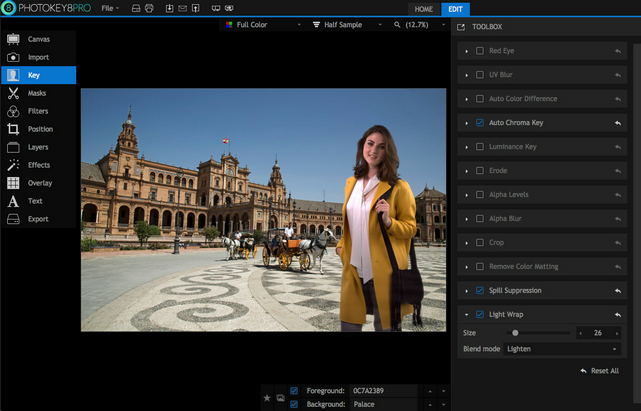
There are numerous filters in the Key toolset. You can use as many or as few as you want by turning them on and off.
To turn a filter on click anywhere in its title bar.
Any individual filter can be reset to its default settings by clicking the Reset icon in its title bar. For filters containing multiple properties, individual properties can be reset to their default values by right-clicking on the slider handle for that property. The entire toolset can be reset to its defaults by clicking the Reset All button below the filter stack.
Filter List
Red eye
If a photo suffers from 'red eye', caused by an on-board flash, you can correct it using the red eye filter.
By default it is set to auto and will attempt to auto-detect any red eye present in the foreground image, using face detection. If the auto-detect is not fixing the red eye in your photo, uncheck the auto option to enable manual mode.
Clicking Select Eyes activates the manual selection mode. You can now click on each red eye in the image to apply the correction. Once you have finished selecting the affected eyes click the Complete button in the toolbox.
If incorrect areas of the image are being affected by the red eye filter, click the Clear button to reset it.
UV blur
Some digital images lack the detail required for high quality keying, which can result in jagged edges to a key. The UV blur can help to enhance the digital information and avoid this problem. If you notice 'stepping' at the edges of your foreground layer, like a pixellated staircase, then the UV blur should be turned on.
For high quality images the UV blur is not needed.
| • | Type: a variety of different blur types are available. Which looks best will depend upon the image itself and the type of camera used. Gaussian blur is the default, and is a high quality blur which should suffice for most uses. |
| • | Blur: controls the radius of the UV blur. Increase this value until the jagged edges are no longer present. |
Auto Color Difference
There are two methods for removing the green screen from your photos. Auto color difference is the simpler and less powerful option. (The more powerful Auto Chroma Key tool is covered later on this page)
| • | Color: when set to automatic, PhotoKey will attempt to automatically detect whether you are using a green screen or a blue screen. If it fails to select the correct color, try manually selecting the correct color from the menu. |
| • | Removal: by default, PhotoKey attempts to remove as much of the green screen as possible. With reflective materials this can sometimes cause parts of your subject to disappear as well. If parts of your foreground are disappearing, try lowering the Removal setting. |
| • | Detail: the detail slider is useful if PhotoKey is not removing all of your green screen. This can be particularly noticeable if the green screen is not lit properly. Ideally you want the detail set to 100%, which is designed for optimal green screens with correct lighting and high quality images. Lowering the detail will help to remove more of an unevenly lit green screen but may also reduce edge detail on the subject. |
| • | Softness: the softness adjusts the edge of the removed area, as set by the detail slider. A high softness setting will create a soft, subtle feathering around the edge. A low softness will create a hard, solid line. |
The softness setting only takes affect if the Removal setting is below 100%.
Auto Chroma Key
PhotoKey's advanced auto chroma key provides high quality, professional results for the removal of colored backgrounds. See Auto chroma key for full details. This tool is much more powerful than Auto Color Difference (discussed above), but its greater level of control comes with greater complexity.
Luminance Key
The Luminance Key is useful for removing white or black backgrounds which cannot be easily handled using traditional chroma or color difference keying. It selects areas of your image for removal based on the luminance values contained in the image.
| • | Key Type: enables you to select whether the darker areas or brighter areas will be removed. Select the appropriate option based on whether your background is black or white. |
| • | Threshold: Sets the threshold at which the luminance key will divide the light and dark areas. |
| • | Tolerance: softens the edges of the selection. As you increase the tolerance, a wider range of tones will be included |
| • | View Matte: toggle this option on to view a greyscale representation of the matte created by the luminance key. In the Matte view, black areas are transparent, white areas are opaque, and grey areas are semi-transparent. |
| • | Brightness type: choose whether the luminance key makes its selection based on intensity values, lightness values, or luminosity values. |
Erode
Some cameras record to compressed formats which can introduce edge problems under some conditions. Often the easiest way to fix this is to erode the keyed image, removing a layer of pixels around the outer edge of the keyed subject matter. Erode should be used sparingly and only when absolutely necessary.
| • | Erode: sets the thickness, in pixels, of the strip that will be removed from the foreground alpha edges. |
If you are using the auto chroma key you can use the integrated Erode/Expand setting instead.
Alpha levels
Adjusting the contrast levels of the alpha channel allows you to fine tune your key. This can be particularly useful with hair or lace and provides an additional level of control over the key.
| • | Black: increasing this slider will crush the dark areas of the matte to black. If you have unwanted areas of your green screen remaining after you have keyed your image, you can increase the black level to remove them. |
| • | White: increasing this slider will crush the light areas of the matte towhite. If you have unwanted transparency in your foreground after you have keyed your image, you can increase the white level to remove them. |
If you are using the auto chroma key you can use the integrated Clip Background and Clip Foreground settings instead.
Alpha blur
If you want a softer edge to your key you can add some alpha blur. This can also be useful if you are working with low quality photographs and need to disguise a problematic edge.
Crop
The left, right, top and bottom sliders can be used to crop the edges of the foreground image. This can be useful if your green screen did not fill the entire frame, or if unwanted objects are visible in front of the edges of the green screen.
The crop tool only affects the alpha of the foreground layer. It does not alter the size or shape of your canvas. To change the shape of the canvas, you should use the Canvas toolset.
Remove Color Matting
When using the luminance key, this tool helps to restore semi-transparent edge details by removing and dark or bright outlines from the foreground.
| • | Background Color: Click and drag the pipette to select the background color of your foreground. While the pipette is selected, the original color of your foreground will be show, so you can easily select any color from your image, even if it is a color that has already been removed by the key. Alternately, you can click the color swatch to manually select a color. |
Spill Suppression
Automatically removes light spill from your green screen and replaces it with natural spill from your new background. This tool features a wide array of tools to ensure you can retain accurate color even in problematic images.
See Spill suppression for details.
Light wrap
This effect simulates the appearance of light from the background interacting with the foreground, as would happen with the normal photographic process.
Size: alters the radius of the light wrap. Adjust this to match the lighting in the foreground and background images. In general, the brighter the background, the larger the size should be, but the setting you choose will depend on the resolution of your images, the specific images in use, and your personal preference.
Blend mode: select the blend mode used to blend your light spill onto the foreground layer. Lighten tends to be the most realistic, while Soft Light can be effective for dark backgrounds. For backgrounds depicting a light source that would create backlighting, Screen or Add can be effective.