Even a perfectly composed image can still suffer from color spill. This is when the green or blue of the screen is reflected on the subject. While this is often difficult to see in the original image, once it has been composited it becomes extremely obvious, resulting in unwanted color fringing around edges.
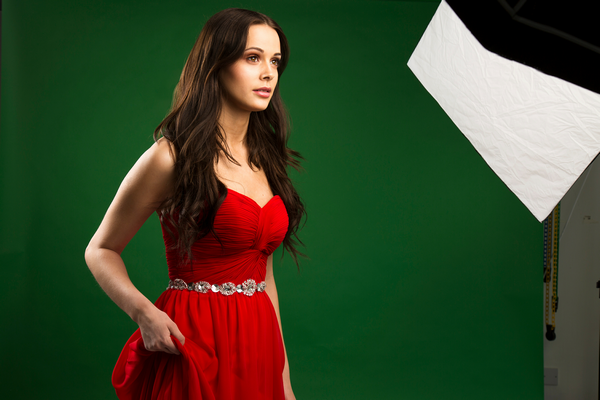
In this original photo the green spill is not immediately obvious to the naked eye:
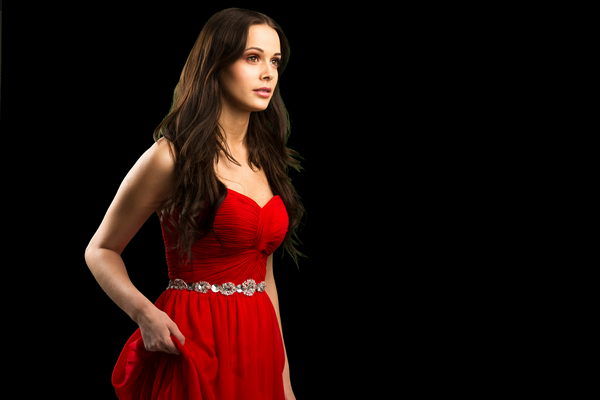
Once the green screen is removed by PhotoKey, it is evident that there is green around the edges of her hair:
Here's a close-up view - note the green visible on the outside edge of the hair:
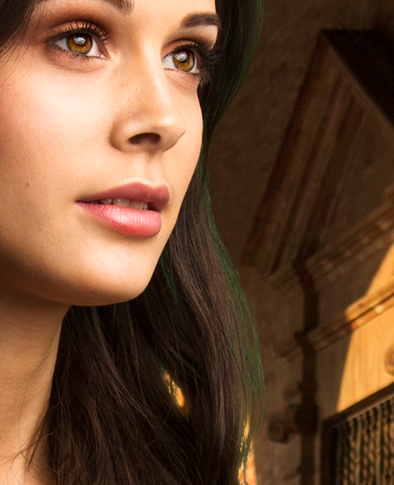
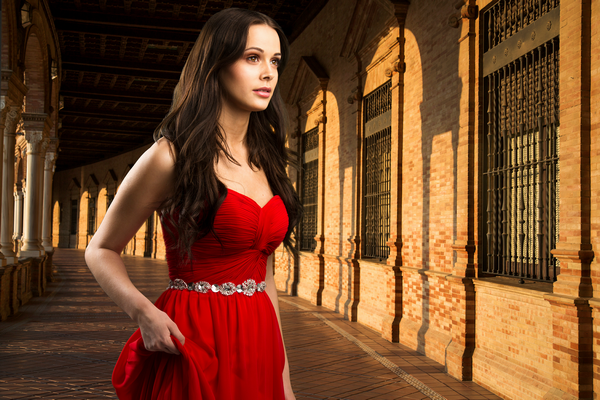
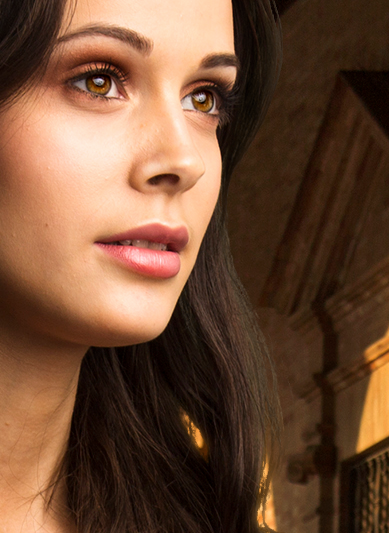
With PhotoKey's spill suppression turned on, the green tint is replaced with a neutral color, without the other colors being affected:
Again, here is a close-up of the same area:
The amount of spill will vary depending on the subject and your green screen setup. White clothing, for example, can be particularly susceptible to bounced green light.
There are multiple types of spill suppression, each of which can be fine tuned.
Apply
Spill suppression can be applied before or after Masks.
| • | After Masks: the entire image will be spill suppressed, including any masked areas set to retain parts of the foreground. This is useful if you are using masks to fix problems such as highly reflective materials or crystal, where you want to retain detail but remove green spill. |
| • | Before Masks: any masks that are set to retain parts of the foreground will include the original coloring from the photo. This is useful if you are using masks to retain objects which are the same color as the screen, such as green clothing, where you need to also retain the original color. |
Spill method
There are five types of spill suppression: standard, extended, advanced, spill simulation and spill simulation pro. In most cases spill simulation pro will provide the best results.
The controls shown in the lower portion of the Spill Simulation controls will vary based on the spill method you have selected.
| • | Standard, Extended and Advanced: These modes are provided primarily for legacy purposes, and remove spill using a less sophisticated method. Standard works well for subjects with strong yellow hues, while Extended retains more accurate blue tones. Advanced provides specific control over each color channel. |
| • | Spill Simulation: the spill simulation method gives you fine control and replaces the original green spill with a color you select. This allows you to replace the green with a more appropriate color, based on your image. If your subject's hair has a lot of green spill in it, for example, you can replace it with a color from their hair, to get a much more natural looking and accurate image. |
| • | Spill Simulation Pro: the spill simulation pro method gives you fine control and replaces the original green spill with natural, simulated spill from your new background image. So rather than replacing all the spill with a single color, like standard spill simulation, the spill is replaced with different colors in different areas, based on what color is present in your selected background layer. This creates the most realistic composite images in many cases. |
Spill Settings
The following controls are available when either the Spill Simulation or Spill Simulation Pro methods are selected
View
You can switch to the Despill Map view when using the spill simulation methods. This shows exactly which parts of the image will be spill suppressed.
White = suppressed area.
Grey = partially suppressed area.
Black = unsuppressed area.
You can use the despill view to make sure that only the areas that need spill suppressing are affected. This can be very useful for avoiding discoloration of your subject.
Amount
Varies the strength of the spill suppression.
Hue Range, Balance and Hue Balance
These three sliders area used to adjust how much of the foreground image is affected by the spill suppression. They are best adjusted when in the despill view, so you can see how much is affected.
| • | Hue Range: Adjusts the range of hues that will be suppressed. Increasing this means more of your foreground colors will be altered, so in general you want to avoid raising it unless necessary. |
| • | Balance: controls what hues in the image are affected |
| • | Hue Balance: |
Luminance
The brightness of the background can be used to influence the brightness of the spill suppressed areas. The effectiveness of this will depend on the specific combination of lighting in your foreground and background.
Blur [Spill simulation pro only]
The background is used to generate a new, realistic spill that replaces the original spill from the green screen. Increasing the blur generates a softer, more diffuse spill which doesn't correlate as directly with the background details.
Color [Spill simulation only]
Defines the color which will be used to replace the green spill. Use the pipette to select a color from an appropriate area of your subject or background, or click the color swatch to define the color using the standard color picker.